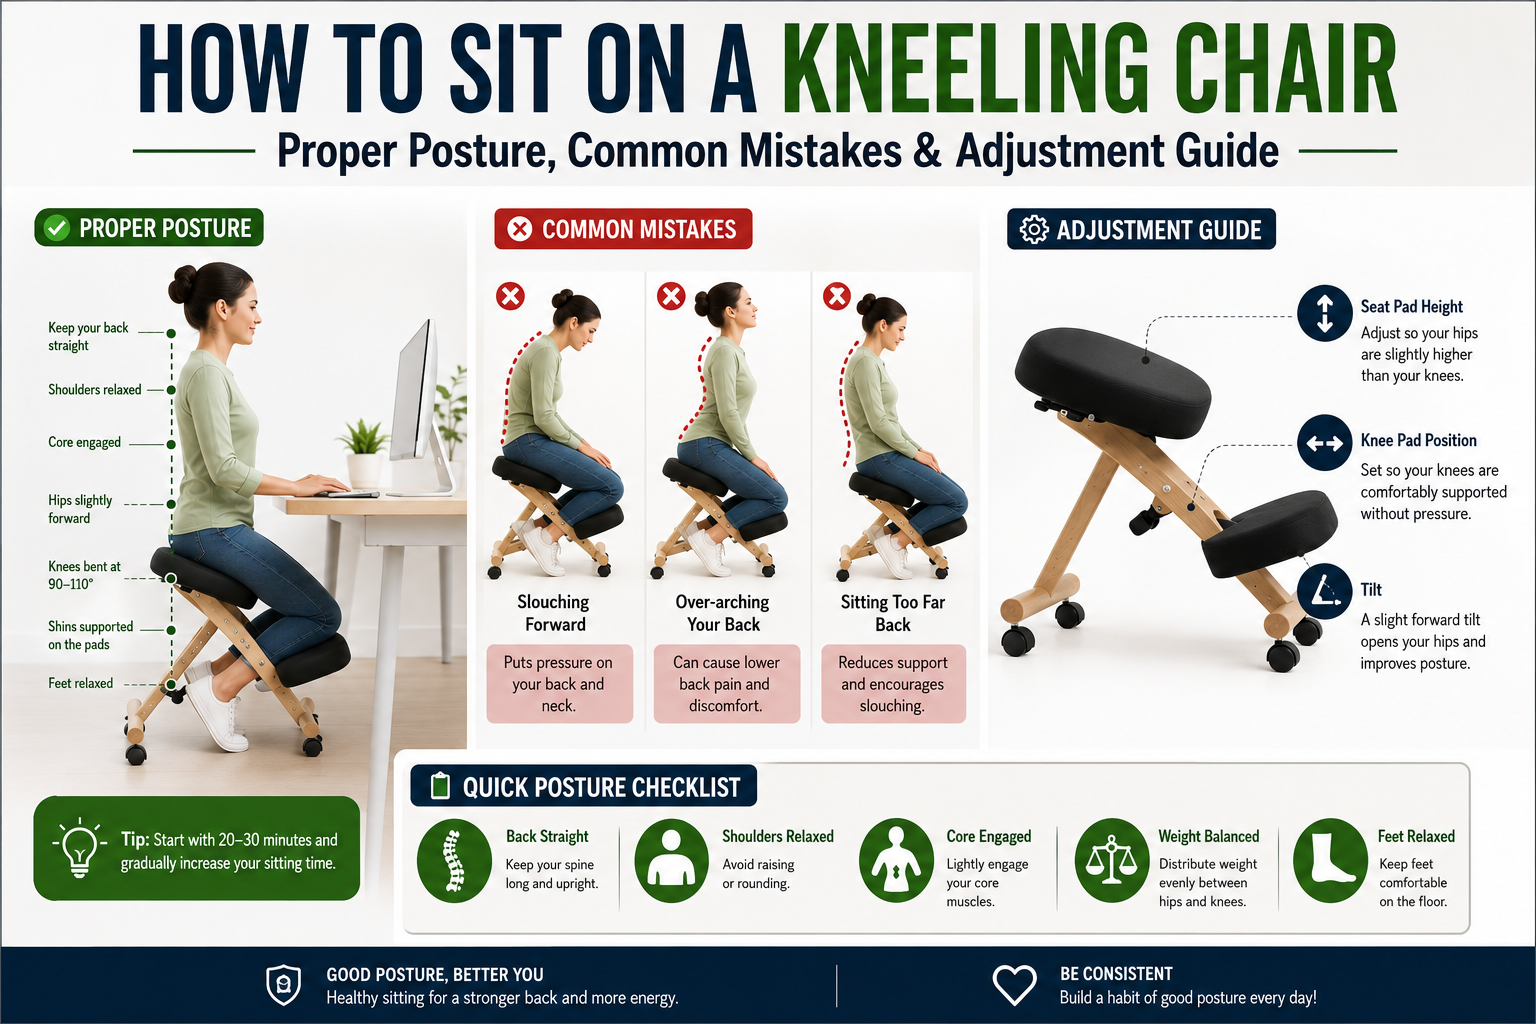
You have just unboxed your new kneeling chair. The wood is smooth, the cushions are plush, and you are eager to relieve your lower back pain. But when you sit down, something feels off. Your shins press into the pads, your weight feels uneven, and after a few minutes, you are not sure if you are doing it correctly.
Kneeling chairs are not intuitive. The posture they require is different from anything you have experienced in a traditional office chair. Without proper technique, you can trade one discomfort for another — shin pain, knee pressure, or even new back strain. This guide walks you through exactly how to sit on a kneeling chair, how to adjust it for your body, and how to avoid the most common mistakes that cause new users to give up too soon.
Quick Answer: How to Sit on a Kneeling Chair in 5 Steps
- Adjust the seat height so your thighs slope downward at roughly 45°.
- Position your shins on the knee pads so your weight is distributed evenly.
- Place your feet on the floor or the footrest (if available).
- Lean forward slightly to let your pelvis tilt naturally.
- Maintain a neutral spine with your ears, shoulders, and hips aligned.
But the details matter. Read on for a full breakdown of each step, common mistakes, and how to transition safely.
What Makes Kneeling Chairs Different (Biomechanics)
A kneeling chair does not have a backrest. Instead, it uses a forward‑sloping seat and padded knee supports. Your shins rest on the knee pads, and your thighs angle downward, typically between 60° and 70° relative to your calves. This position opens your hip angle to 120–135°, which tilts your pelvis forward (anterior pelvic tilt).
This forward tilt does two important things: it preserves the natural S‑curve (lordosis) of your lower back, and it shifts part of your body weight from your spine to your shins. The result is reduced pressure on your lumbar discs and active engagement of your core muscles.
Unlike a traditional chair that allows (and often encourages) slouching, a kneeling chair makes it easier to sit upright and harder to collapse into a C‑curve. However, this biomechanical advantage only works if you sit correctly. Incorrect adjustment or posture can lead to shin pain, knee discomfort, or upper back strain.
Step‑by‑Step Guide: How to Sit on a Kneeling Chair Correctly
Step 1: Adjust the Seat Height to Your Body
Your kneeling chair must be adjusted to your height and your desk. Start by setting the seat height so your thighs slope downward at approximately 45°. Your knees should be slightly lower than your hips. If the seat is too high, your hips will be higher than your knees, reducing the open hip angle and negating the ergonomic benefit. If the seat is too low, your weight will shift too far onto your shins, causing discomfort.
Most kneeling chairs have height adjustment holes or a pneumatic lift. Adjust incrementally until you feel a balanced distribution of weight between your buttocks and shins — roughly 80% on your seat, 20% on your shins.
Step 2: Position Your Shins on the Knee Pads
Place your shins (not your knees) on the padded supports. The pads should contact the front of your shins, just below the kneecap. Do not rest your kneecaps directly on the pads — this can cause patellar pain over time. Your feet may rest on the floor, on a footrest, or dangle slightly, depending on your height and the chair design.
If the knee pads are too far forward or backward, adjust the knee pad position (on chairs that allow it) or reposition your body. Your shins should make firm, even contact without excessive pressure.
Step 3: Find Your Balance Point
Sit upright and allow your body to find its natural balance. You should feel your weight distributed across three points: your sitting bones (ischial tuberosities), your thighs, and your shins. You should not feel like you are tipping forward or straining to hold yourself up. If you feel constant pressure on your hands or arms to keep yourself upright, your seat height is likely incorrect.
To test your balance: lift your hands off your desk. You should be able to maintain an upright posture without falling forward. If you cannot, lower the seat slightly or adjust the angle of the knee pads.
Step 4: Align Your Spine (Ears–Shoulders–Hips)
Once balanced, check your spinal alignment. Your ears should be stacked directly over your shoulders, and your shoulders over your hips. Your lower back should have a gentle inward curve — not flattened, not over‑arched. If you feel your lower back rounding, tilt your pelvis slightly forward by contracting your lower abdominal muscles. If you feel excessive arching, relax your pelvis slightly.
Your head should be level, not tilted up or down. The top of your monitor should be at or slightly below your eye level. If you are looking down at your screen, raise your monitor or lower your chair.
Step 5: Position Your Desk and Monitor
A kneeling chair raises your seated eye level by 4–8 inches compared to a standard office chair. If you keep your desk at the same height, you will be forced to look down, creating forward head posture and neck strain. Raise your monitor using a riser, stack of books, or adjustable monitor arm. Your elbows should rest at 90° when typing, with your forearms parallel to the floor.
Common Mistakes and How to Fix Them
Mistake 1: Resting Your Knees Directly on the Pads
Why it happens: Users assume the pads are for their kneecaps because of the name “kneeling chair.”
How to fix: Slide backward so the pads contact your shins, not your kneecaps. If your chair allows adjustment, move the knee pads downward or backward.
Mistake 2: Sitting Too Upright (Fighting the Forward Tilt)
Why it happens: The forward tilt of the seat feels unstable, so you lean back to compensate.
How to fix: Allow your pelvis to tilt forward naturally. Relax into the position. The forward tilt is a feature, not a bug. If you feel like you are falling forward, lower the seat height.
Mistake 3: Keeping Your Desk at Standard Height
Why it happens: You forget that a kneeling chair raises your eye level.
How to fix: Raise your monitor at least 4 inches. Use a monitor riser or an adjustable desk. After raising the monitor, re‑check your neck alignment — your head should be level, not tilted down.
Mistake 4: Hunching Your Shoulders
Why it happens: The active sitting posture requires core engagement, and when your core fatigues, your shoulders round forward to compensate.
How to fix: Take shorter sessions (20–30 minutes) until your core strength improves. Also, ensure your desk height is correct — your elbows should be at 90°, not reaching up or down.
Mistake 5: Ignoring Shin Discomfort
Why it happens: The knee pads are too thin or your weight distribution is off.
How to fix: Add extra padding — a folded towel, gel knee pads, or a memory foam cushion. Adjust the seat height so more weight transfers to your buttocks. Over time, your shins will adapt, but persistent sharp pain means the chair is not adjusted correctly.
Mistake 6: Using the Kneeling Chair for Too Long Too Soon
Why it happens: Enthusiasm leads you to sit for hours on the first day.
How to fix: Follow a gradual transition schedule (see below). Your body needs time to adapt to the new posture and weight distribution.
How to Transition to a Kneeling Chair (Week‑by‑Week Plan)
Switching from a traditional office chair to a kneeling chair requires a deliberate transition to avoid shin pain, back fatigue, and discouragement. Follow this schedule:
Week 1: Use the kneeling chair for 20–30 minutes, then switch back to your regular chair. Do this 2–3 times per day. Your body needs time to adapt to the new pelvic position and weight distribution on your shins.
Week 2: Increase sessions to 1 hour at a time. You may experience mild shin soreness — this is normal. If sharp pain occurs, add extra padding or reduce duration.
Week 3: Use the kneeling chair for half of your workday (2–3 hours total), alternating with standing or your regular chair.
Week 4 and beyond: Use the kneeling chair as your primary desk chair, but continue to stand up and move every 30–45 minutes. Even with perfect posture, static sitting for hours is unhealthy.
How to Know If Your Kneeling Chair Fits Your Body
Even with correct technique, a kneeling chair that does not fit your body will never be comfortable. Check these fit indicators:
- Seat width: Your sitting bones should fit comfortably on the seat without spilling over the edges. A seat that is too narrow will pinch; one that is too wide will spread your legs uncomfortably.
- Knee pad spacing: Your shins should rest naturally on the pads without your legs being forced outward or squeezed together. Adjustable knee pads are ideal.
- Height range: When adjusted to your desk height, your thighs should slope downward at 45°. If your chair cannot achieve this angle with your desk, the chair is the wrong height for your workstation.
- Cushion thickness: If you feel the hard frame beneath the padding within 30 minutes, the cushions are too thin. Look for chairs with at least 2 inches of high‑density foam.
If your chair consistently causes pain despite correct adjustment, consider trying a different model with more padding, wider adjustment range, or a different seat design.
Frequently Asked Questions (FAQ)
Does sitting on a kneeling chair take time to get used to?
Yes — most users need 1–2 weeks to adapt. The first few days may feel strange, and you may experience mild shin soreness. This is normal as your body adjusts to the new weight distribution. By the end of the second week, most users report feeling comfortable and notice improved posture.
Should my knees or shins touch the pads?
Your shins should touch the pads, not your kneecaps. Position yourself so the pads contact the front of your shins, just below the kneecap. Placing your knees directly on the pads can cause patellar pain over time.
Can I use a kneeling chair if I have bad knees?
It depends. If you have patellofemoral pain, runner’s knee, or a history of knee surgery, a kneeling chair may aggravate your condition. The weight placed on your shins transfers some load to the knee joint. Consult your physician or physical therapist before trying a kneeling chair. For those with mild knee sensitivity, adding extra padding (gel knee pads) can help.
Why does my lower back hurt when I use a kneeling chair?
Lower back pain during kneeling chair use usually indicates incorrect adjustment. Possible causes: (1) the seat is too high, causing excessive forward tilt; (2) your pelvis is not tilting forward enough, leaving your lower back flat; (3) you are fighting the forward tilt by leaning back, which rounds your spine. Re‑adjust the seat height and consciously relax into the position. If pain persists, reduce session length and gradually increase.
Do I need a special desk for a kneeling chair?
Not necessarily, but you must raise your monitor. A kneeling chair raises your seated eye level by 4–8 inches. If your desk is fixed at standard height, use a monitor riser, stack of books, or an adjustable monitor arm. For the best experience, a height‑adjustable desk allows you to match the desk height perfectly to your kneeling chair posture.
Can I use a kneeling chair all day?
Yes — many people use kneeling chairs as their primary desk chair. However, because the posture engages your core muscles and places some weight on your shins, you may feel more fatigue at the end of the day compared to a passive office chair. It is best to alternate between a kneeling chair, standing, and a conventional chair throughout the day.
How do I stop my shins from hurting?
Shin pain is the most common complaint among new kneeling chair users. Solutions include: (1) add extra padding (gel pads, folded towel, or thicker cushions); (2) adjust the seat height to transfer more weight to your buttocks; (3) reduce session length and build up gradually; (4) ensure your shins — not your knees — are contacting the pads. With proper adjustment, shin pain typically resolves within 2 weeks.
What is the ideal thigh‑to‑calf angle for a kneeling chair?
The scientifically recommended angle is 60–70° between your thighs and calves. This angle dramatically reduces spinal compression and maintains proper lumbar lordosis. If your chair allows angle adjustment, set it within this range. If not, adjust your seat height and position until your thighs slope downward at roughly 45°, which typically achieves the correct 60–70° thigh‑calf angle.
Final Tips for Long‑Term Success
Kneeling chairs are tools, not cures. They work best when combined with other healthy habits:
- Stand up every 30–45 minutes. Your intervertebral discs rely on compression and decompression cycles to stay healthy.
- Strengthen your core. The kneeling chair engages your core, but weak abdominal muscles will fatigue quickly. Planks, bird‑dogs, and dead bugs are excellent complementary exercises.
- Stretch your hip flexors. The open hip angle of a kneeling chair helps, but tight hip flexors can still pull on your pelvis. Add a hip flexor stretch to your daily routine.
- Do not ignore pain. Mild soreness during the adjustment period is normal. Sharp, shooting pain is not. If you experience persistent pain, stop using the chair and consult a professional.
Most important advice: No chair, no matter how well‑designed, can replace movement. Even with the perfect kneeling chair, you must stand up, stretch, and walk every hour. Your spine needs variety — not any single static posture. Use your kneeling chair as one tool in a movement‑rich daily routine.